
Beginner Chipping Technique Around the Green
To play a basic chip around the green, use a compact, stable stance and a repeatable ball position, then make a short, smooth stroke without scooping at the ball. Choose a landing spot and club to match the carry and rollout you need, adjusting for the lie, slope, green speed and available green rather than relying on one fixed setup.
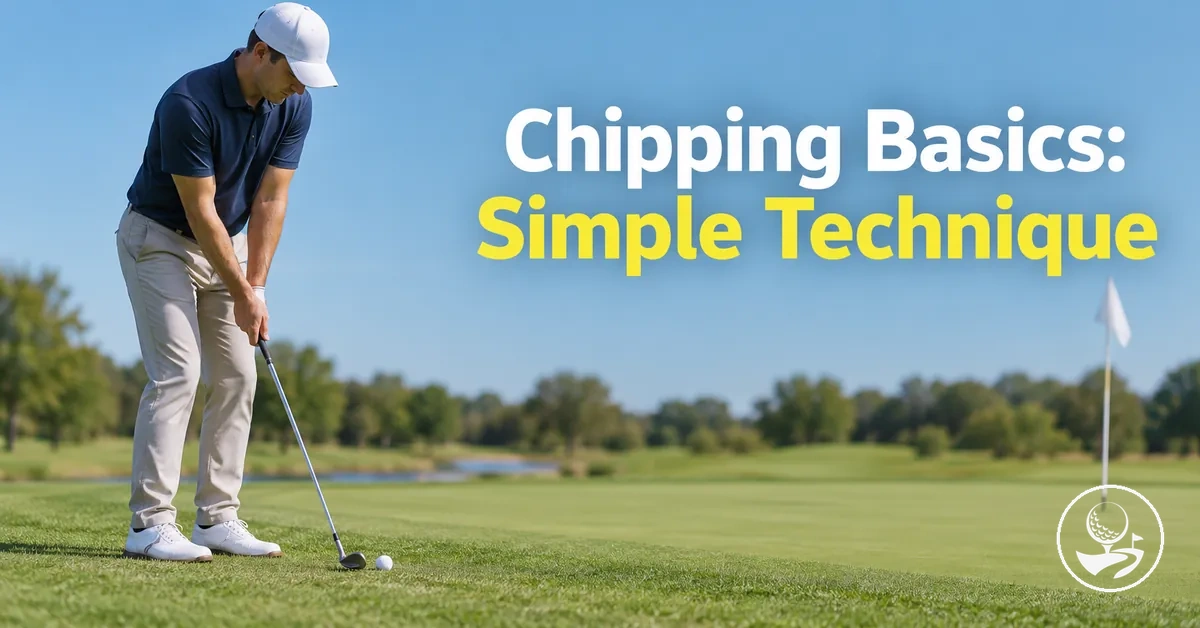
BEGINNER CHIP-SHOT GUIDE
One chip. Four decisions.
Follow this sequence from address to first bounce and beyond. Each step influences contact, flight or the amount the ball rolls.
-
Set up for contact
Use a compact stance, steady pressure and repeatable ball position, with neutral or modest forward shaft lean.
-
Make a controlled stroke
Make a short takeaway, move smoothly through contact and finish in balance. Avoid scooping or slowing at impact.
-
Connect carry to rollout
Pick a landing spot and a club whose loft suits the required carry and the green available for rollout.
-
Read and adjust
Check strike and rollout. Review setup or pace for contact errors, and slope or club for distance errors.
How the conditions change your plan
- More green to work with
- A lower flight and more rollout may suit the landing plan.
- Little green or an obstacle
- More carry may be needed; a higher pitch may suit an obstacle.
- Uphill or slower green
- Expect shorter rollout; consider a farther landing spot.
- Downhill or faster green
- Expect longer rollout; leave more green after landing.
These are directional guides, not fixed distances, ball positions or carry-to-roll ratios. The lie and your strike also affect the result.
Table of Contents
Set Up for a Basic Chip Shot
A repeatable chip-shot setup brings ball position, foot pressure, stance width and shaft orientation together before the club moves. These address choices influence the club’s low point, launch and how consistently the ball is struck.
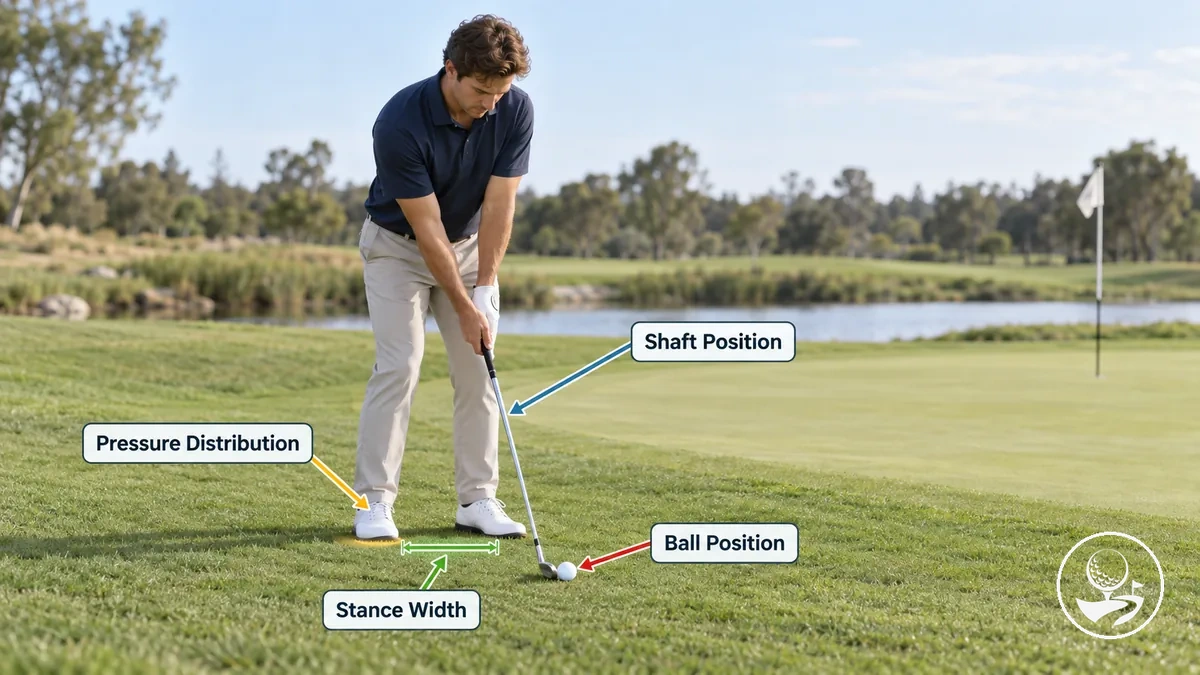
Because one adjustment can affect the others, start with a compact stance, steady pressure and a shaft that is neutral to modestly forward-leaning. Refine the ball position and pressure bias for the flight and contact the shot requires.
- Ball position: Set the ball at a repeatable position within the stance; its exact location can shift when the intended launch or contact changes.
- Pressure distribution: Keep pressure stable, with a lead-side bias as a common baseline, while allowing the amount of bias to change with the shot and technique.
- Stance width: Use a compact stance that supports balance and keeps the address simple for a short chip.
- Shaft position: Keep the shaft between a more neutral position and modest forward lean according to the contact and launch you are trying to produce.
Ball Position for a Basic Chip
Ball position is relative to your stance rather than a universal fixed point. PGA of America instruction describes positions from just behind centre for a lower-running chip to just ahead of centre for some tight-lie situations; select the position for the flight and contact you need.
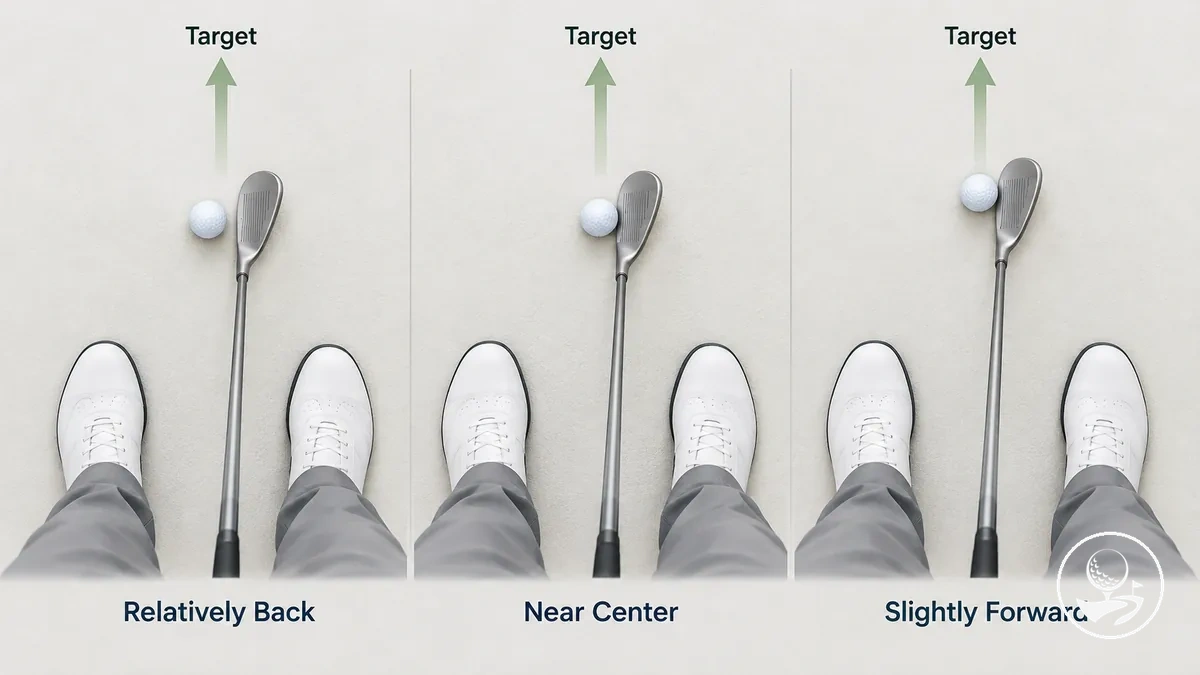
These are directional tendencies, not guarantees: club loft, lie, technique and landing conditions also affect launch and rollout.
- Relatively back: This position tends to support a lower launch and a more descending contact pattern, which can produce more rollout after landing.
- Near centre: This position provides a more neutral reference for launch and contact, with rollout influenced by the club, landing conditions and motion.
- Slightly forward: This position can increase launch and alter strike conditions; when it produces a higher landing trajectory, the ball may roll less after landing.
Weight Distribution at Address
At address, foot pressure can be relatively balanced or biased towards the lead foot (the foot nearer the target). Choose a distribution that keeps you stable and supports a repeatable low point, rather than aiming for a universal percentage.
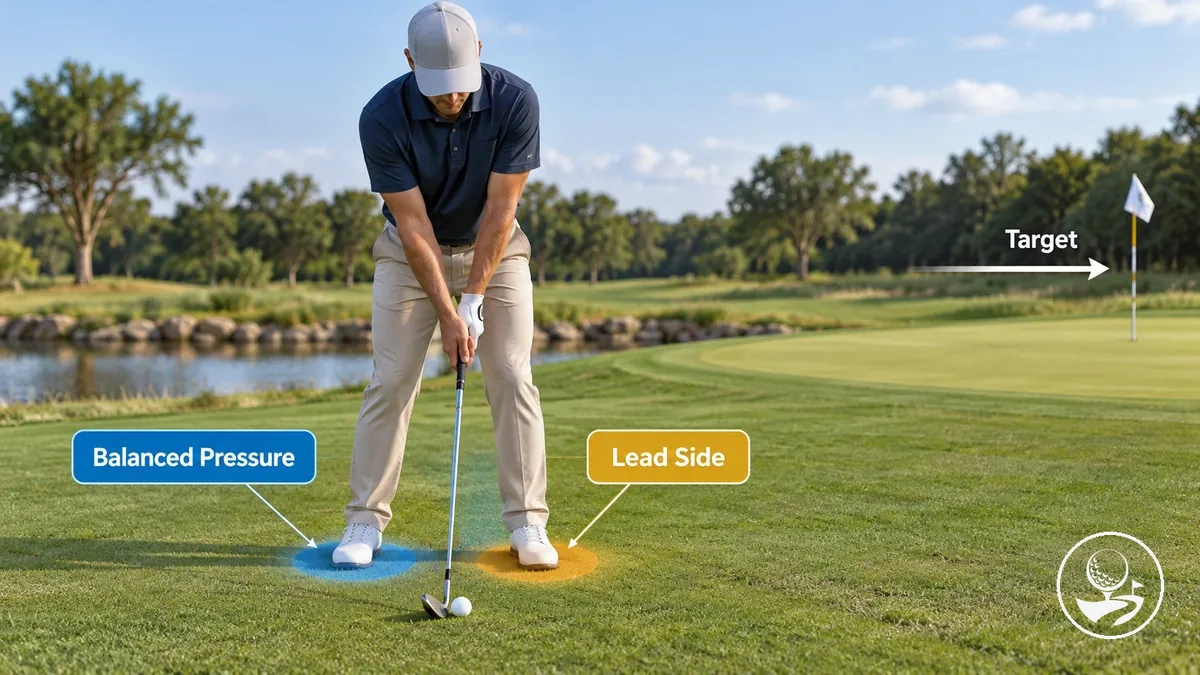
- Relatively balanced pressure
- Can provide a stable starting point when the address and ball contact remain repeatable.
- More pressure on the lead foot
- May help organise the low point for a different strike. Keep the pressure steady during the short motion rather than swaying away from the target.
Stance and Shaft Position
Stance width determines the golfer’s base and address geometry; shaft orientation changes the relationship of the hands, clubhead and effective loft. These are separate adjustments, although both influence a chip’s contact pattern.
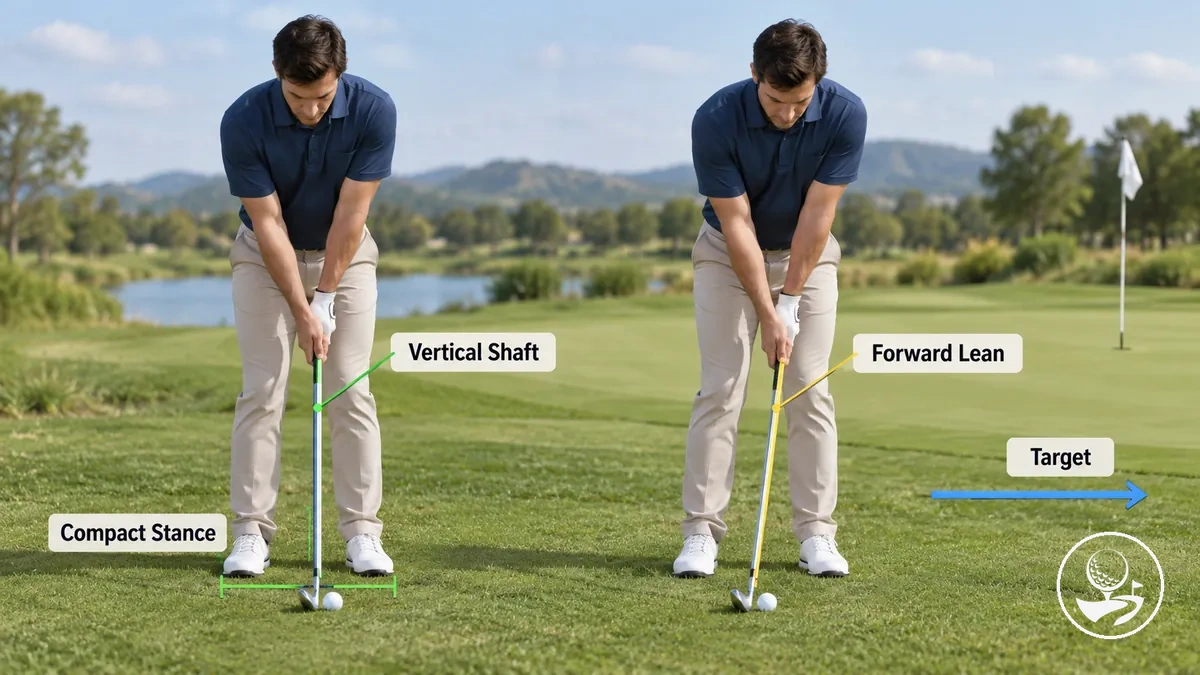
Use a compact stance and a shaft between neutral and modest forward lean as practical references—not fixed widths or angles. Make a change only when the shot’s lie, desired launch or contact calls for it.
- Stance width: A compact or relatively narrow stance can simplify the address geometry and support stability during a short chip.
- Shaft position: A more vertical shaft and modest forward lean represent different address options; changing shaft orientation can alter effective loft and contact conditions without making either position universally correct.
Make a Short, Controlled Chipping Motion
A beginner chip uses a short, controlled motion rather than added power. Treat the takeaway, downswing, strike and finish as one continuous movement so the club’s low point and pace remain predictable.
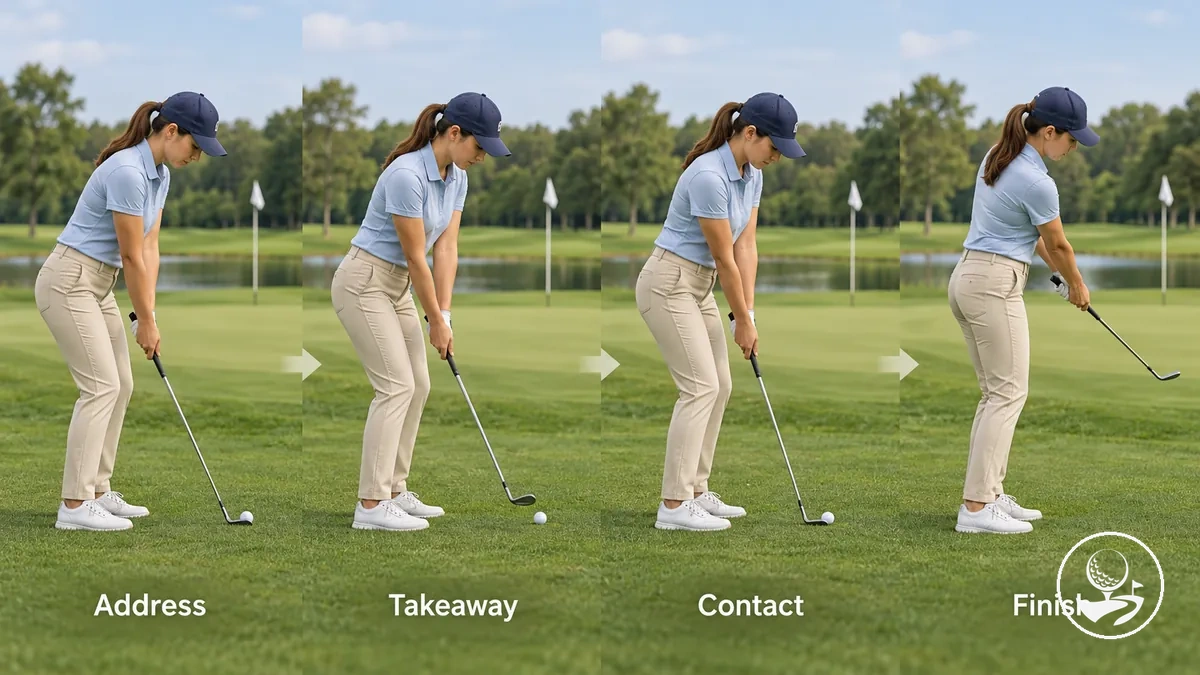
- Take the club back compactly: Make a short takeaway that keeps the motion controlled and proportional to the shot rather than building an excessive backswing.
- Return with steady pace: Change direction smoothly into the downswing and keep the movement continuous; avoid a sudden burst of acceleration or slowing sharply before contact.
- Move through contact: Let the club reach the ball without scooping it upward, using the controlled motion to support a predictable low point and strike.
- Finish in balance: Complete the motion without stopping abruptly and match the finish length to the intended shot and rollout.
Choose a Landing Spot and Plan the Roll
Carry is the distance the chip travels in the air to its first landing point; rollout is how far it runs after landing. Plan both together: the landing zone determines the carry, and the remaining usable green allows the ball to run towards the hole.
- Assess the usable landing area: Identify a landing zone on the green that gives the ball a suitable surface for its first bounce and leaves enough available green for the intended rollout.
- Estimate the rollout: Read the slope and green speed to judge whether the ball is likely to keep running, slow sooner or change direction after landing.
- Choose the landing spot: Select a point that connects the required carry with the remaining rollout rather than choosing the landing location in isolation.
- Match the club and trajectory: Choose a club and trajectory that can produce the required carry-to-roll pattern, adjusting the choice when the conditions change.
For example, when a chip has plenty of available green between the landing zone and the hole, the plan can allow more rollout after a shorter carry; with less usable green or a slope that changes the rollout, the landing spot may need to shift.
The practical decision combines landing location, expected rollout and shot conditions, not a fixed carry-to-roll ratio.
Adjust for Slope and Green Speed
Slope and green speed influence how far a ball rolls after landing: uphill or slower conditions tend to shorten rollout, while downhill or faster conditions tend to extend it. These are directional effects, not a fixed formula.
- Uphill: An uphill slope tends to reduce rollout after landing, so the landing spot may need to move farther along the intended line to account for the shorter rollout.
- Downhill: A downhill slope can extend rollout, so choosing an earlier landing location can leave more available green for the ball to run.
- Faster green: A faster green tends to increase rollout for a similar landing condition, which can favor a landing spot that leaves additional room for rollout.
- Slower green: A slower green tends to shorten rollout, so the landing location may need to allow more carry before the ball reaches the surface.
Match Club Choice to Carry and Roll
Choose a club for the carry-to-roll pattern the landing plan needs. Lower loft generally means a lower shot with more rollout; higher loft generally means more carry and less rollout. Lie, technique and green conditions can change those results.
| Club Example | Relative Loft | Carry Tendency | Roll Tendency | Suitable Landing Requirement |
|---|---|---|---|---|
| 8-iron | Lower than the wedge examples | Tends to carry a smaller portion of the shot | Tends to produce more rollout | Suits a landing spot with more available green for the ball to run |
| Pitching wedge | Higher than an 8-iron and lower than a sand wedge | Tends to carry a greater portion of the shot than an 8-iron | Tends to roll less than an 8-iron but more than a sand wedge | Suits a landing plan requiring a more balanced carry-and-roll pattern |
| Sand wedge | Higher than the other examples | Tends to carry a greater portion of the shot | Tends to produce shorter rollout | Suits a landing spot where more carry and less rollout are required |
Correct Common Beginner Chipping Mistakes
Beginner chipping mistakes usually affect setup, pace, structure or impact rather than requiring a completely new technique. First identify what happened to the contact and then compare the recognition cues below.
- Chunked chip
- The club hits the ground before the ball, often losing speed before impact and leaving the shot short.
- Bladed chip
- The club’s leading edge catches the ball too high, often sending it out low and faster than intended.
| Mistake | Likely Consequence | Recognition Cue | Corrective Direction |
|---|---|---|---|
| Poor setup | Can make the low point and contact less consistent, contributing to chunked or bladed results. | The address position changes noticeably from one chip to the next. | Re-establish the repeatable basic address before changing the motion. |
| Jerky pace | May contribute to inconsistent contact and unpredictable distance control. | The takeaway or change of direction feels abrupt rather than continuous. | Use a shorter motion with a smoother, more continuous pace. |
| Loss of structure | Can shift the club’s low point and make the strike less predictable. | The relationship between the body, arms and club changes sharply as the club approaches contact. | Maintain stable structure through the short motion instead of making a late correction. |
| Scooping | May contribute to a bladed chip, a chunked chip or inconsistent launch. | The club is actively flicked upward in an attempt to lift the ball. | Let the club move through contact without adding a last-moment upward scoop. |
| Decelerating into contact | Can produce weak contact or an inconsistent strike when the motion loses pace before the ball. | The takeaway becomes longer than needed and the club noticeably slows as it reaches contact. | Match the motion length to the shot and maintain controlled pace into the finish. |
A poor result is a clue, not proof of one cause. Both chunked and bladed chips can arise from more than one setup or motion error; use the table’s specific recognition cue before changing technique.
Match the correction to what you actually observe, then return to the repeatable address and controlled stroke instead of adding unnecessary movements.
How a Chip Differs From a Pitch
A chip is generally a lower shot that carries a smaller share of its total distance and rolls farther after landing. A pitch generally flies higher, carries more of the distance and rolls less.
There is no fixed yardage boundary. Choose between the two according to required flight, carry-to-roll tendency and landing behaviour.
| Shot | Trajectory | Carry-to-Roll Tendency | Landing Behavior | Typical Situation |
|---|---|---|---|---|
| Chip | Generally lower | Less carry and more roll | Tends to land sooner and use available green for rollout | May suit a shot choice with open green between the landing area and the hole |
| Pitch | Generally higher | More carry and less roll | Tends to land farther into the shot and continue with less rollout | May suit a situation where an obstacle or limited usable landing area requires more carry |
Shot choice should follow the required flight and landing conditions rather than a rigid distance threshold.
Open green can favor the lower, more roll-oriented chip, while an obstacle or restricted landing area may call for the higher flight of a pitch; detailed pitching technique is outside this chipping section.