
Beginner Golf Swing Basics for Solid Contact
For solid contact, beginners should prioritise a balanced, repeatable backswing-to-follow-through sequence over extra swing speed. For a typical iron shot from turf, meet the ball before the ground with the low point beyond the ball; a teed driver struck on the upswing has a different low-point relationship.

The swing at a glance
One connected motion. Three useful checks.
The sequence controls the club’s return; club and lie change the contact conditions, while tempo and balance offer feedback.
-
01 · Motion
Turn, then change direction
Turn in balance, change direction smoothly and return the club with your body and arms.
Check You can change direction without recovering from a sway.
-
02 · Impact
Let the club travel through the ball
Keep moving through impact rather than freezing into a fixed pose.
Check Judge the low point against your club and lie.
-
03 · Feedback
Repeat the rhythm and finish
Repeat a manageable rhythm and complete the follow-through in balance.
Check A stable finish is feedback, not proof of perfect mechanics.
Club-and-lie rule: For a turf iron, contact is typically ball, then ground, with the low point beyond the ball. A teed driver struck upwards generally reaches its low point before the ball. Do not apply the iron rule to every shot.
Start at a pace you can control. A controlled full swing is easier to repeat and evaluate than a harder, less balanced swing; even good balance cannot guarantee the quality of every strike. The sections below explain the sequence and its observable checkpoints.
Table of Contents
Build the Swing in a Simple Backswing-to-Follow-Through Sequence
A golf swing sequence is easiest for a beginner to execute as one connected motion: backswing, transition, downswing, impact and follow-through.
Each phase prepares the club and golfer for the next rather than functioning as an isolated position.
Before the club starts moving, use a balanced stance, comfortable grip and ball position appropriate to the club. These setup basics support a simple, continuous swing rather than a collection of forced positions.
The visual shows the temporal order of the full swing, while the numbered steps identify each phase's purpose and one observable check without prescribing one exact body-motion pattern.

- Backswing: Move the club away from the ball while turning in balance to prepare for the return motion. Check that you can reach the end of the backswing without losing balance.
- Transition: Change direction smoothly so the backswing can flow into the downswing. Check that the club begins returning without an abrupt throw from the top.
- Downswing: Continue the coordinated return of the body, arms and club toward the ball. Check that the motion remains controlled as the club approaches impact.
- Impact: Let the moving club pass through the ball as part of the continuing swing sequence rather than treating impact as a position to stop at. Check that the motion continues through the strike.
- Follow-through: Allow the swing to continue into a balanced finish. Check that you can complete the motion under control rather than falling away from the finish.
The phases should flow into one another: the backswing prepares the transition, the transition starts the downswing, and the motion through impact continues into the follow-through and balanced finish.
Backswing: Turn While Maintaining Balance
The backswing should create a controlled turn while preserving balance and preparing the club for the change of direction.
The goal is coordinated movement rather than making the backswing as long as possible.
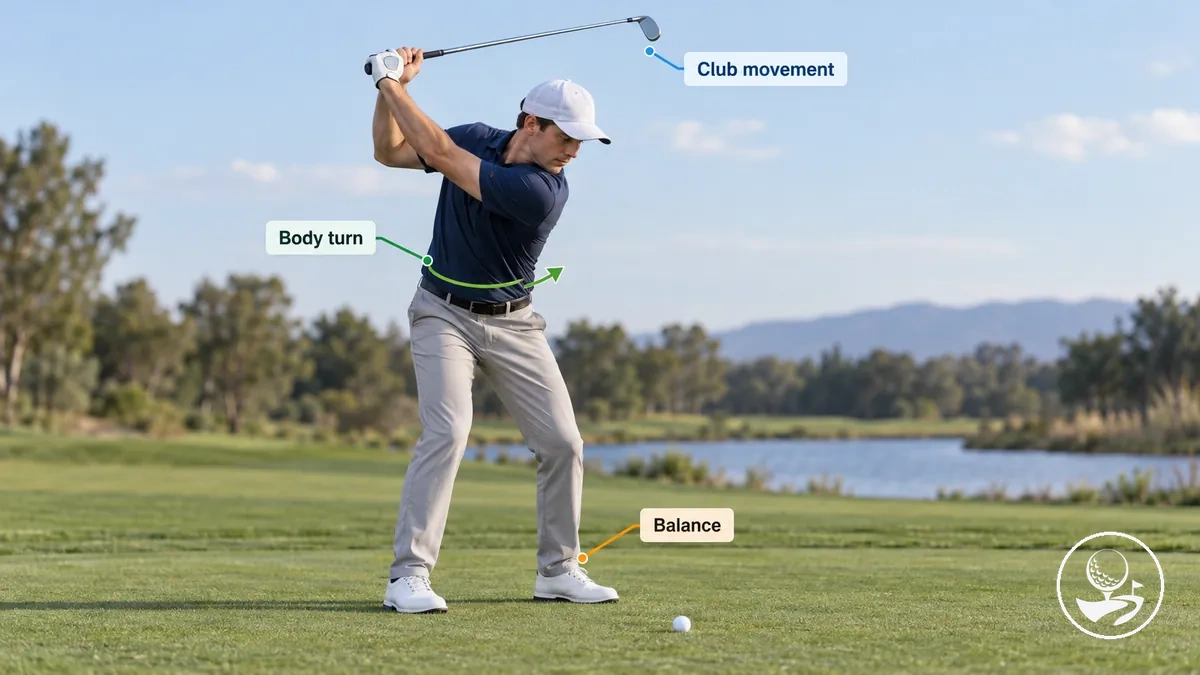
As the body turns, pressure can move towards the trail foot—the right foot for a right-handed golfer and the left foot for a left-handed golfer—without swaying away from the stance.
The arms and club should move with the body turn instead of lifting independently.
The amount of turn, pressure movement and backswing length can differ between golfers. If a longer backswing disrupts balance or the change of direction, shorten it until you can turn and return the club under control.
Downswing: Return the Club Toward the Ball in Sequence
The downswing begins with a coordinated transition that changes direction and returns the club toward the ball rather than throwing the club independently from the top.
The aim is to keep the body, arms and club working in sequence as the swing moves toward impact.

During the transition, pressure can move towards the lead foot—left for a right-handed golfer and right for a left-handed golfer—as the body begins rotating and the arms deliver the club towards the ball.
The exact timing and amount of each movement can differ between golfers, but the useful condition is coordinated motion that keeps the club returning toward impact under control.
The arms should remain connected to the turning motion rather than racing ahead of it or being left behind.
This keeps the downswing continuous instead of turning it into a series of forced positions.
Follow-Through: Finish the Swing in Balance
The follow-through continues the swing after impact and provides a practical check on whether the motion finishes under control.
A balanced finish should feel stable rather than forced, with the golfer able to complete the motion without falling away from it.

As the follow-through develops, continued rotation and support toward the lead side can help the golfer finish with balance and control.
The club should complete its motion around the body as the swing sequence comes to a stable finish.
A fall-back or off-balance finish can indicate a loss of control during the preceding motion, although a balanced finish does not prove that every earlier movement was correct.
Finish quality is therefore a useful observable cue about the completed swing, not a pose to manufacture.
Control Impact and Low Point for Solid Contact
Impact is where the clubhead strikes the ball, while the low point is where the clubhead reaches the bottom of its swing arc.
For a typical turf iron shot, solid contact is supported when the strike occurs before that low point, so the ball is contacted before the clubhead reaches the ground.
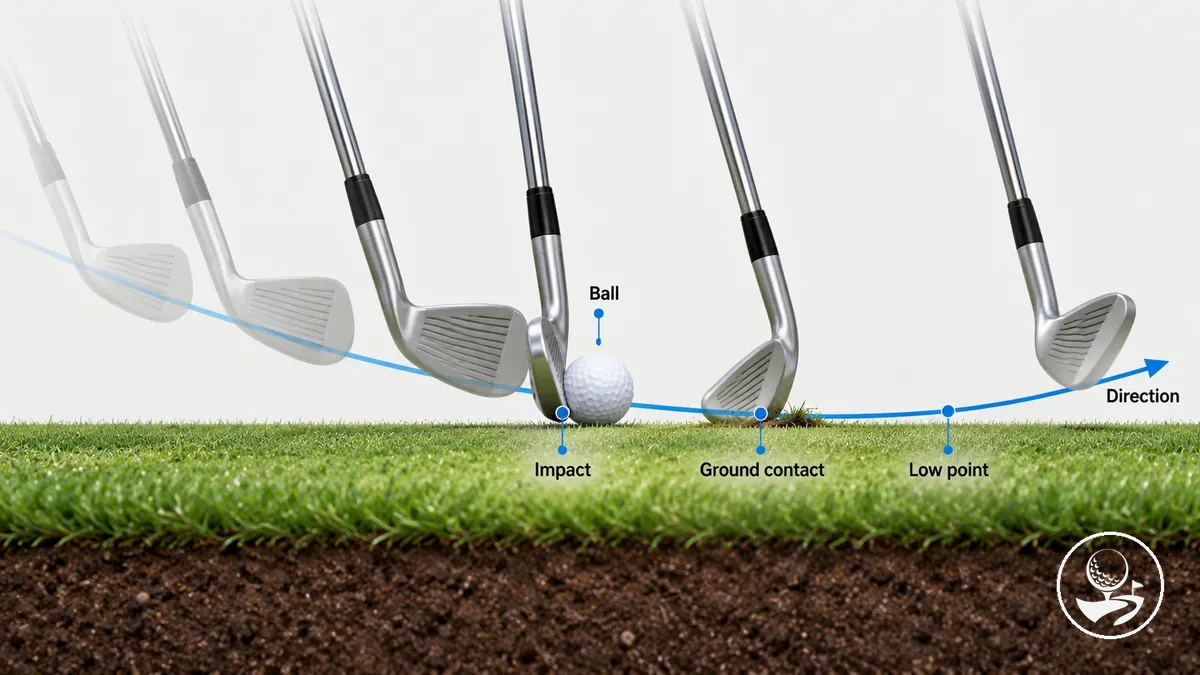
- Iron played from turf
- Ball → turf → low point. For the usual ball-first iron strike, the clubhead meets the ball, travels towards the target and reaches the turf and the bottom of its arc beyond the ball. This is the contact order described in PGA coaching guidance.
- Driver played from a tee
- Low point → upward strike at ball. For a typical upward attack, the clubhead passes the bottom of its arc before meeting the teed ball. TrackMan distinguishes this low-point relationship from the usual turf iron strike.
Both descriptions are shot-specific, not universal swing poses. Judge the low point in relation to the club, ball position and lie rather than requiring identical ground contact.
As the clubhead moves through impact, pressure moving towards the lead side can support continued movement through the strike rather than leaving the bottom of the arc behind the ball.
The goal is to control the club's contact sequence, not simply to hit down harder.
Repeated variation in where the club meets the ball or ground belongs to separate diagnosis rather than this basic implementation step.
Ball-First Contact: Where the Club Should Meet the Ground
For a typical iron shot played from the turf, ball-first contact means the clubhead strikes the ball before it reaches the ground.
For the typical turf iron shot, the clubhead reaches its low point on the target side of the ball: the practical strike order is ball first, then turf.
A forward low point should result from a coordinated swing rather than a steep chopping action.
Ground contact after the ball can support clean iron contact, but a visible divot is not required for every good strike. Turf firmness, lie and how shallowly the club is delivered all affect the ground mark.
Other clubs and lies may require different ground interaction, so this criterion applies specifically to the typical turf iron shot.
Impact Position: Check Pressure, Hands and Clubface Through the Strike
Impact is a dynamic zone through the strike rather than a static position to freeze.
Useful impact conditions should be observed while the body, hands, shaft and clubface continue moving through the ball.
The main checks are lead-side pressure, continued body motion, the hands-and-shaft relationship and clubface orientation.
These conditions help evaluate how the club is delivered through impact and how the strike relates to direction, but their exact appearance can vary with the club and shot rather than forming one universal pose.
- Lead-side pressure: Check that pressure is moving toward the lead side through the strike, supporting continued motion and control rather than a forced static position.
- Body motion: Observe whether rotation and body motion continue through impact instead of stopping abruptly at the ball, helping the swing move through the strike as one action.
- Hands and shaft: Check the relationship between the hands and shaft as the club reaches impact; the useful relationship depends on the club and shot, so one exact amount of shaft lean is not required for every swing.
- Clubface: Observe the clubface orientation relative to the intended starting direction and the club’s movement through the strike. The face angle strongly influences the initial direction of many full shots, while swing path and strike location also affect the result.
Use Tempo to Keep the Swing Sequence Connected
Golf swing tempo describes the rhythm and timing relationship among the swing phases rather than raw swing speed.
A golfer can swing relatively quickly or slowly and still use a repeatable tempo if the backswing, transition and downswing remain coordinated in sequence.
How the rhythm stays connected
- Backswing
- Give the turn enough time to develop in balance.
- Transition
- Change direction smoothly without a sudden rush from the top.
- Downswing
- Continue the rhythm as the club returns through impact.
Backswing duration, transition timing and downswing pace work together; the useful standard is repeatable coordination, not one prescribed cadence.
The goal is to repeat a connected rhythm at a controllable pace rather than force the swing to be artificially slow or fast.
Use Swing Checkpoints to Verify the Motion
Swing checkpoints are feedback cues for verifying whether the motion remains connected, not new positions to manufacture.
Use them to observe how the swing progresses from backswing through impact and finish without freezing the movement into separate poses.
Each checkpoint should connect an observable state with what that state suggests about control and coordination.
A useful cue supports verification, but does not prove every underlying mechanic is correct. Look for the same pattern across several swings rather than drawing a firm conclusion from one strike.
- Backswing balance: Check whether you reach the end of the backswing without losing balance; stability suggests the motion remains controlled before the change of direction.
- Transition: Observe whether the transition begins smoothly rather than with an abrupt throw from the top; a coordinated change of direction suggests the sequence is staying connected.
- Impact and low point: For a typical turf iron shot, check whether the strike occurs before the clubhead reaches its low point; this suggests the previously established impact and ground-contact relationship is being maintained.
- Balanced finish: Check whether the swing ends with a stable, balanced finish under control; this suggests the motion continued through the strike rather than breaking down before completion. Use all checkpoints as feedback on movement quality rather than exact poses to freeze or copy.