
How Beginners Can Stop Topping the Golf Ball
To stop topping the golf ball, identify contact on the ball’s upper half, then check the ball position and swing low point for the club you are using. An iron usually needs ball-first, descending contact; a teed driver can be struck after the low point on the upswing. Test one plausible setup or movement cause at a time and judge improvement by repeatable, more centred strikes, not one good shot.
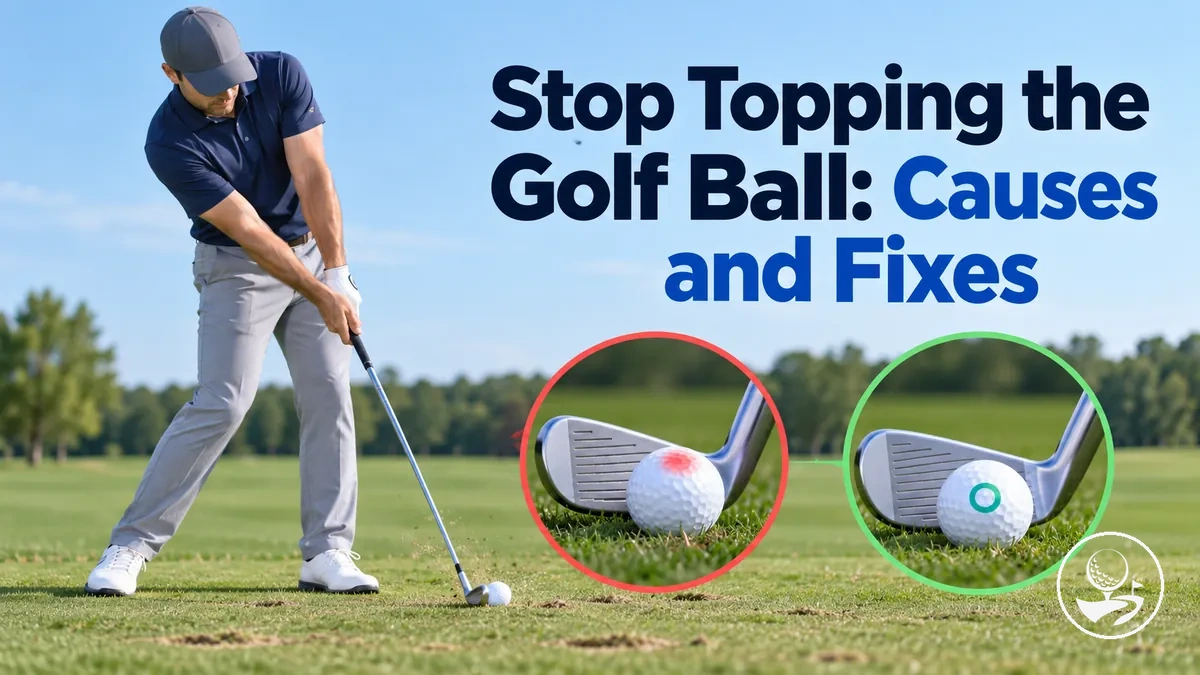
Topped-shot troubleshooting
Find the first thing to check
Choose the club and the clearest repeated clue. The result identifies a practical check to try, not a guaranteed diagnosis.
First interpretation
Identify the repeatable contact pattern
Low flight by itself does not confirm a top or identify a swing fault.
Next check: Observe contact high on the ball and compare the swing low point with the ball position for this club.
Keep the other variables stable and compare several strikes. A clue can support a hypothesis, but only a repeatable pattern helps you judge the correction.
Low-point position, posture, recentering and arm extension can each change strike height. Start by recognising the mishit, then use the sections below to confirm which relationship actually needs attention.
Table of Contents
How to Recognize a Topped Golf Shot
A topped shot is identified first by contact high on the ball rather than by a presumed swing fault.
The defining recognition cue is the strike location: the clubhead meets the upper part of the golf ball at impact, which can produce an unusually low or ground-hugging result.
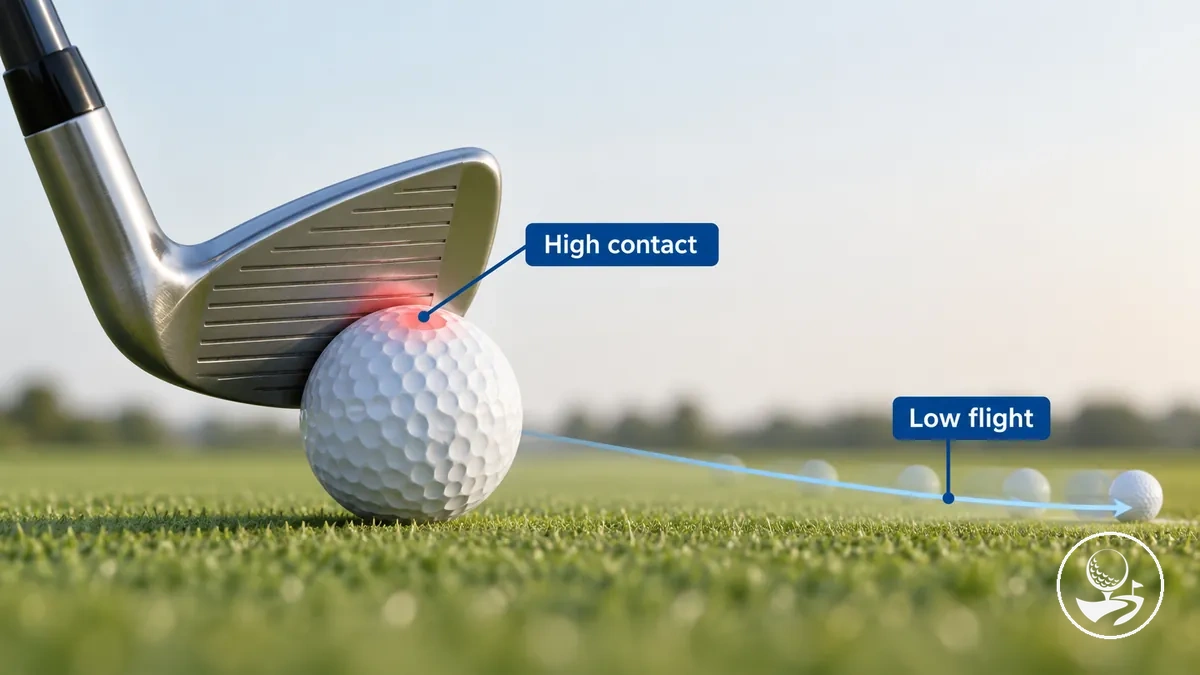
The resulting ball flight can vary with the club and the severity of the topped contact, so low flight alone is not enough to identify the mishit.
A higher strike location can reduce useful launch and carry, while a more severe top may reach the ground quickly and continue through bounce or rollout.
The following recognition cues separate observable strike and flight signals from any later diagnosis of why the shot occurred.
- Strike location: contact is high on the golf ball, around the upper portion rather than the intended contact area.
- Initial flight: the shot may leave unusually low after impact.
- Ground-hugging result: a more severe topped shot may bounce early or travel close to the ground.
- Carry: useful airborne distance is reduced, with more of the remaining distance potentially coming from bounce or rollout.
For example, a shot that leaves low, reaches the ground quickly, and also shows contact high on the ball is consistent with a topped shot.
These observations identify the contact pattern; they do not establish the swing or setup condition that caused it.
Topped Shot vs Thin Shot
A topped shot and a thin shot are related mishits, but their contact location differs: a top involves contact above the ball equator, while a thin shot involves the leading edge or lower clubface meeting near the ball equator.
The comparison below uses contact location, typical flight, ground interaction, and diagnostic implication to distinguish the two without assuming they share the same cause.
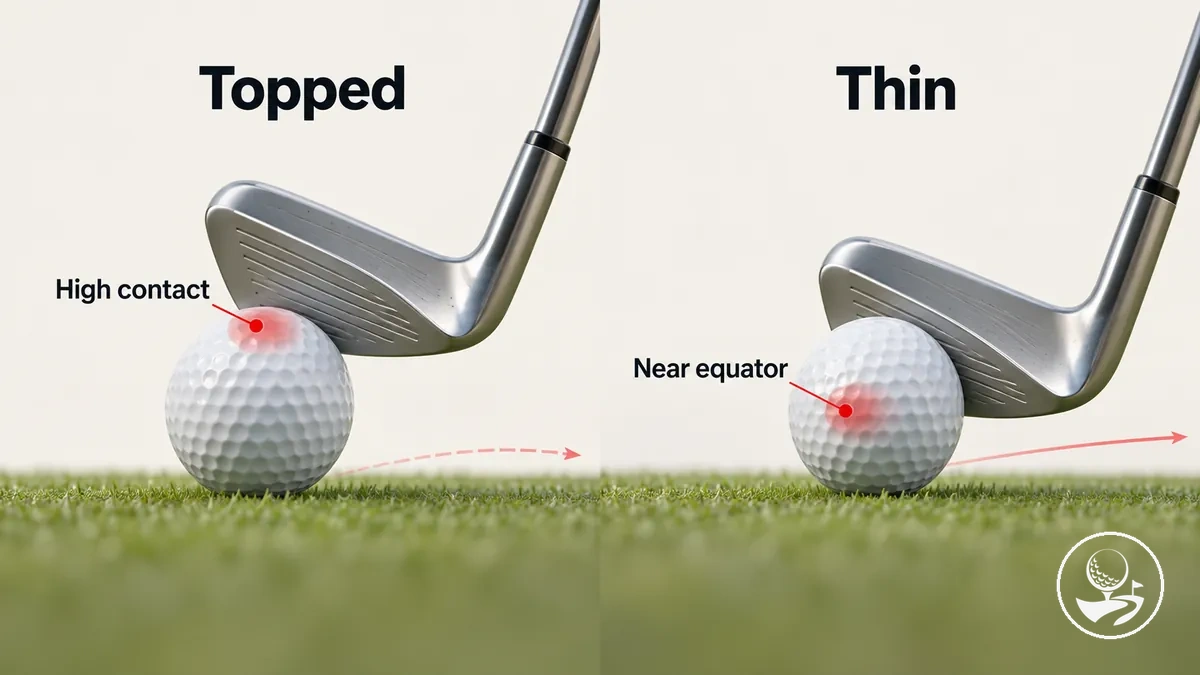
| Shot type | Contact location | Typical flight | Ground interaction | Diagnostic implication |
|---|---|---|---|---|
| Topped shot | The clubhead contacts the upper part of the ball above the ball equator. | Often very low or ground-hugging, with early bounce or rollout possible. | The club may pass through impact without reaching the intended contact depth relative to the ball and ground. | Upper-ball contact supports a topped-shot diagnosis. |
| Thin shot | The leading edge or lower part of the clubface meets near the ball equator. | Often lower and more penetrating than intended, although the ball may remain airborne. | Ground contact may be slight or absent because the club meets the ball before reaching the intended depth. | Contact near the equator supports a thin-shot diagnosis rather than a topped-shot diagnosis. |
Flight and ground interaction can vary with club choice, strike severity, and impact conditions, so a low shot alone does not reliably separate a topped shot from a thin shot.
The stronger diagnostic distinction is contact location: upper-ball contact points toward topping, whereas contact near the ball equator points toward thinning.
Why the Club Strikes the Top of the Ball
A topped shot occurs when the clubhead reaches impact too high relative to the golf ball and contacts the upper part of the ball.
This high strike is the shared impact geometry behind topping, but it does not identify a single swing fault; the diagram isolates that common contact condition rather than assigning it to one cause.
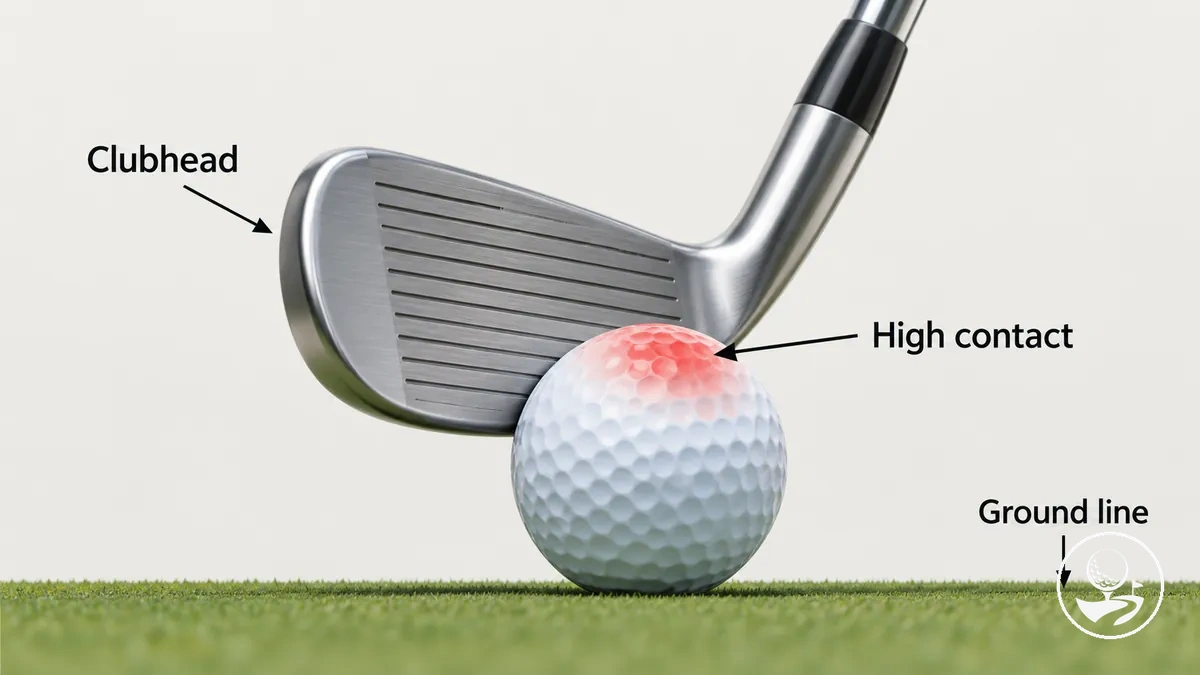
Different changes can produce the same high strike
- Low point and ball position
- The ball meets the swing arc at a height unsuitable for that club and intended contact.
- Posture and body spacing
- An early rise or change in distance from the ball can leave the clubhead higher at impact.
- Sway and recentering
- Excess movement away from the target or an incomplete return can shift the swing bottom.
- Lead-arm extension
- Early bending can shorten effective swing radius and keep the clubhead above its intended path.
Each relationship is a possible contributor, not a confirmed cause. Match it to the club, contact pattern and repeated observations before applying a fix.
A Low Point in the Wrong Place for the Club
The low point is the bottom of the clubhead’s swing arc, and its correct relationship to the ball depends on the club and intended strike condition.
If the low point and ball position do not suit that condition, the clubhead can reach the ball at the wrong height and contribute to topped contact; the diagram shows this club-dependent relationship rather than one universal low-point position.
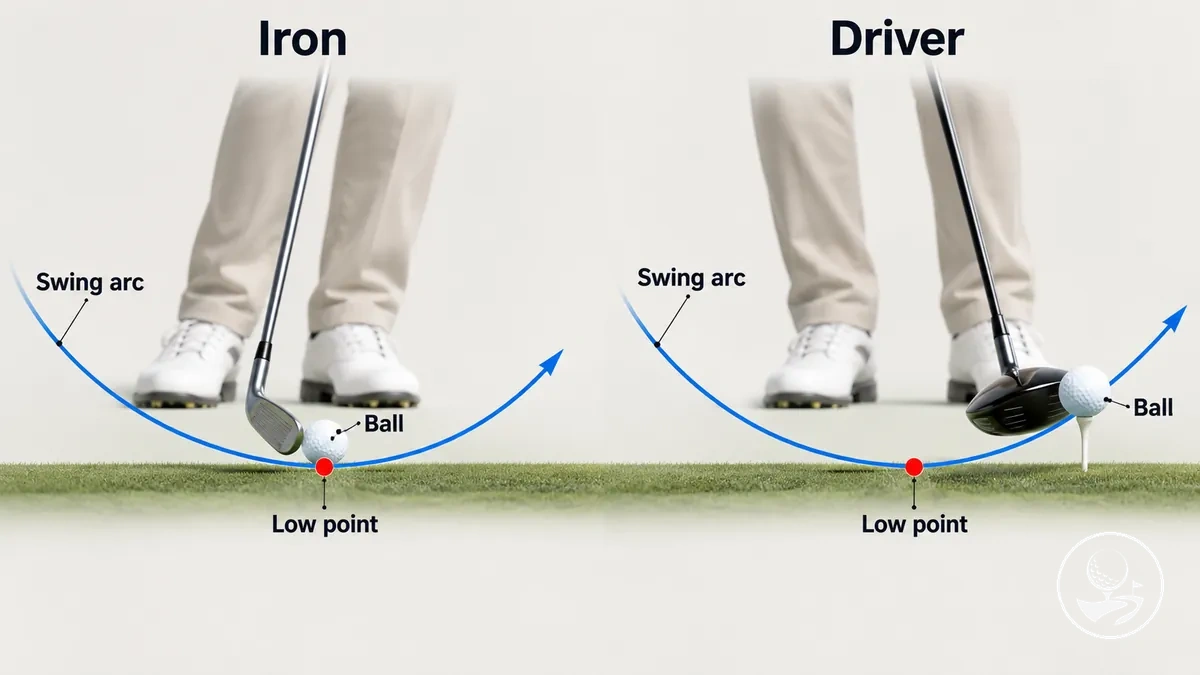
With an iron, the usual strike condition involves descending, ball-first contact: the club meets the ball before the swing arc reaches its low point and can continue toward the turf after impact.
With a teed driver struck on the upswing, the low point occurs before the ball, so the clubhead is rising at impact.
Because those relationships differ, a low point or ball position that does not suit the intended club can raise topping risk rather than defining one correct position for every shot.
A suspected low-point problem therefore needs to be checked against the club and intended contact condition before it is treated as the cause.
Ball Position Relative to the Swing Low Point
Ball position changes where the golf ball sits relative to the low point of the existing swing arc, which can change the clubhead's strike height at contact.
The useful reference is therefore the ball-to-low-point relationship for the club and intended strike, not one universal position in the stance; the diagram shows that relative relationship rather than prescribing an exact fixed spot.
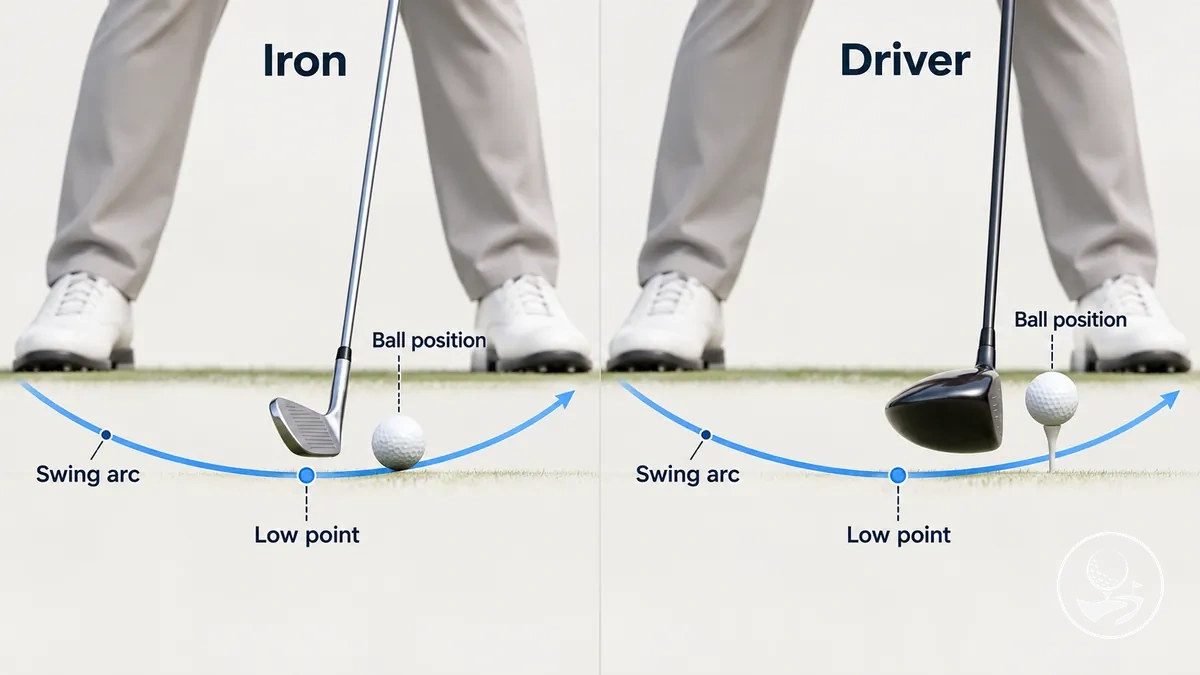
With an iron, placing the ball farther forward relative to the golfer's actual low point can move contact closer to or beyond the bottom of the swing arc, increasing the chance that the clubhead reaches the ball too high.
A driver is normally played farther forward because a teed driver can be struck after the low point while the clubhead is moving upward.
Those club-specific conditions mean a forward position that suits a driver should not be treated as the correct iron position.
Ball position should also be interpreted alongside body motion, because movement during the swing can shift the actual low point; moving the ball alone does not necessarily correct that underlying low-point change.
Rising Out of Posture Through Impact
An early rise through impact occurs when posture changes enough that the golfer loses inclination and increases body height or alters spacing from the ball.
What to watch versus what not to assume
Possible contributing pattern
Body height rises or space from the ball changes abruptly through impact, and the clubhead repeatedly meets the ball too high.
Not enough for a diagnosis
Head movement by itself—or a natural change in inclination during rotation—does not establish posture loss or explain a topped strike.
Look for the body-space change and strike pattern together; staying rigid or trying to freeze the head is not the goal.
Swaying Back or Failing to Recenter
A sway is excessive body movement away from the target during the backswing, not the same as a normal pressure shift.
When sway may affect the strike
- Backswing: The golfer moves excessively away from the target, beyond a normal pressure shift.
- Transition: If the golfer remains back rather than recentering, the swing bottom may shift relative to the ball.
- Impact: That shifted low point can leave the clubhead at an unsuitable height and contribute to a top.
This is a possible sequence, not proof from a single shot.
The relevant check is whether sway and incomplete recentering coincide with the low-point and contact pattern at impact.
Collapsing the Lead Arm Through Impact
Premature bend in the lead arm through impact shortens its effective arm length and reduces the swing radius.
Which part of arm extension matters?
- Possible effect
- A shorter effective swing radius can leave the clubhead too high and contribute to upper-ball contact.
- Useful condition
- The lead arm maintains functional length through impact without forced tension or a rigidly locked elbow.
- Decision cue
- The bend matters when it materially changes strike height in that swing, not because any bend must be eliminated.
Lead-arm collapse is therefore one possible contributing factor to topped contact rather than evidence that every top comes from the arm action.
How to Diagnose the Cause of Your Topped Shots
Diagnose a topped-shot symptom by isolating one likely cause before choosing a correction.
A signal should lead to a check and an interpretation, but no single observation should be treated as proof because several swing or setup faults can produce the same topped result.
- Ground contact: Check where the club meets the ground relative to the ball across repeated shots. A ground-contact pattern that does not match the intended strike can suggest a low-point problem; next, compare that pattern with ball position rather than changing several variables at once.
- Ball position: Check whether ball position is appropriate for the club and compare it with the observed low point and contact. If the topping pattern changes consistently with ball placement, position may be a contributing factor; confirm it while keeping other variables stable.
- Posture and balance: Check for an obvious change in posture, balance, spacing, or recentering through impact. If that movement repeatedly coincides with the clubhead reaching the ball too high, it indicates a plausible movement-related cause that requires confirmation with the same setup.
- Club-specific pattern: Check whether topping appears mainly with one club type or across several clubs. A pattern limited to particular clubs suggests that the intended strike condition, ball position, or low-point relationship should be checked before assuming a swing-wide fault.
These checks work best when their signals are interpreted together rather than in isolation.
Ground contact can suggest where the low point is occurring, ball position changes where the ball meets the swing arc, and posture or balance changes can alter that relationship during the motion.
Because different mechanisms can create similar contact, each interpretation remains a likely cause until repeated observations support it.
Use repeated shots to look for a stable pattern, then test one variable at a time so that any change in contact has a clearer meaning.
If the strike pattern varies widely instead of repeating as a topping-specific symptom, the diagnosis has moved beyond a single topping mechanism and requires broader inconsistent-contact diagnosis.
Check Where the Club Brushes the Ground
Ground contact can act as a practical signal of where the swing reaches its low point, especially with an iron strike intended to contact the ball before the turf.
Check the brush point, turf mark, or divot relative to the ball and interpret the repeated pattern rather than treating one mark as proof.
- Ground contact before the ball: A brush point or divot beginning before the ball suggests the low point may be occurring too early for the intended iron strike; compare the pattern across repeated shots before treating it as a likely cause.
- Ground contact after the ball: Turf contact beginning on the target side of the ball is consistent with the club continuing downward after an iron strike; use the pattern alongside the actual ball contact when judging whether the low-point relationship is appropriate.
- No clear ground evidence: Little or no visible mark can make the low-point interpretation uncertain, particularly with a shallow strike or on a mat; use other contact signals and repeated observations rather than drawing a conclusion from the missing mark alone.
A mat can hide or soften the visual evidence that would be clearer in turf, while a very shallow strike may leave only a faint brush point instead of a distinct divot.
Ground contact therefore remains an indicator rather than confirmation of the low point by itself.
Look for the same relationship between the ball and ground mark across repeated shots, because a repeated pattern carries more diagnostic value than an isolated divot or brush.
Check Ball Position Before Changing the Swing
Check ball position against a practical starting reference before making a larger swing change: short irons are commonly played near the middle of the stance, longer irons progressively farther forward, and a teed driver near the lead heel. These are setup starting points, not fixed requirements for every player or shot; compare them with the low point you actually produce.
Judge a position as too far forward or back only in relation to the club and intended impact: irons typically need a descending, ball-first strike, while a teed driver can be struck as the clubhead rises after its low point.
- Establish the baseline: Compare the current ball position with a normal starting range for that club type and note whether it appears unusually forward or back.
- Make a small adjustment: If the position is a plausible diagnostic variable, make one small adjustment toward the club-appropriate baseline while keeping other setup and swing variables stable.
- Confirm with repeated contact: Observe the contact pattern across repeated shots. A consistent improvement supports ball position as a contributing factor; an unchanged pattern suggests another likely cause should be checked.
Repeated contact feedback matters more than the result of one strike because an isolated shot does not confirm the diagnostic implication.
Ball position should also remain separate from posture, balance, or recentering checks, since a small adjustment cannot correct a low-point problem created primarily by body movement.
Change another variable only after the ball-position test has produced a clear repeated pattern or failed to do so.
Why You May Top Irons but Not the Driver
You may top irons but not the driver because irons and the driver use different ball position, club length, and intended impact conditions.
The comparison below focuses only on differences that affect topping diagnosis, especially how each club relates the ball to the low point of the swing.
| Club context | Ball-position tendency | Low-point relationship | Typical strike requirement | Diagnostic implication |
|---|---|---|---|---|
| Irons | The ball is normally positioned less forward than for a driver, with the exact position depending on the iron and shot condition. | The ball is typically reached before the swing reaches its low point. | Descending contact is normally used so the club can strike the ball before continuing toward the turf. | A setup or low-point pattern that leaves the clubhead too high at the ball can become more apparent as topped iron contact. |
| Driver | The ball is normally played farther forward and from a tee. | The low point can occur before the ball when the intended driver strike uses upward contact. | Upward contact with the teed ball can suit the intended strike condition. | The same setup or low-point tendency may produce a different result with the driver, so successful driver contact does not rule out a problem affecting irons. |
These differences can expose the same underlying setup or low-point issue differently across club types.
A low-point pattern that interferes with the descending contact required for irons may be less obvious when a teed driver is struck after the low point with upward contact.
Club length and setup condition also change the spatial relationship between the golfer, clubhead, and ball.
Diagnosis should therefore compare the topping pattern within each club context rather than applying one cue identically to irons and the driver.
How to Correct Topped Golf Shots
Correct a topped golf shot by first confirming the likely cause, then changing the smallest relevant variable and checking whether contact improves.
One adjustment, then a repeatable test
- Choose the supported cause: Prioritise the low-point or ball-position cue when contact evidence points there; focus on posture, recentering or arm extension when a repeated movement cue is stronger.
- Change only that factor: Make one small setup or movement adjustment while keeping the other conditions stable.
- Check a series of strikes: More centred contact and club-appropriate ground interaction across repeated attempts support the adjustment; one airborne ball does not prove success.
- Reassess when the pattern remains: Recheck the evidence and try the next plausible cause rather than stacking several corrections onto one swing.
Control the Low Point for the Club You Are Hitting
Control the low point by matching the bottom of the swing arc to the club type and its intended strike rather than forcing the same motion for every club.
Start with an appropriate ball position, then use rehearsal and contact feedback to establish whether the swing bottom is returning in a usable place.
- Establish ball position: Set the ball position for the club type and intended strike so the starting setup supports the required low-point relationship.
- Rehearse the intended low point: Make a simple rehearsal that lets the swing arc reach its intended bottom without deliberately forcing a steep strike or applying an iron-style motion to a driver.
- Make a controlled swing: Keep the same setup and reproduce the rehearsed motion at a manageable effort so the low-point pattern can be evaluated without adding another variable.
- Verify strike and ground contact: Check for more centered contact and, where ground interaction is expected, whether ground contact matches the intended strike. Repeat the test before progressing so verification comes from a consistent pattern rather than one successful shot.
Use the strike and ground-contact feedback to judge whether the low-point adjustment suits that club type.
More centered contact across repeated attempts supports the change, while an inconsistent result means the ball position, rehearsal, or swing-bottom relationship should be checked again.
A ball getting airborne once is not sufficient verification if the contact pattern remains unreliable.
Set Ball Position for the Club
Return the ball to the club-appropriate starting position before testing the strike, rather than moving it arbitrarily in response to one topped shot.
Use the normal baseline for that club rather than assuming every ball belongs at the center or equally far forward, because the setup should preserve the intended relationship between the ball and low point.
From that baseline, make only a small adjustment forward or back and keep the other setup and swing variables unchanged.
Test the new ball position across repeated shots and observe the contact pattern rather than judging one strike.
If the adjustment produces more consistent contact, that feedback supports keeping the change; if it does not, return to the baseline before testing another variable.
This controlled process keeps ball position as one corrective setup variable rather than treating it as a guaranteed explanation for every topped shot.
Maintain Posture Through the Strike
Maintain enough posture, inclination, and space through impact for the clubhead to return at the intended height while allowing natural rotation.
The objective is controlled body motion rather than holding the body rigid, because the amount of posture change that works can depend on the individual swing.
- Establish balanced inclination: Set up in a balanced posture with enough space between the body and the ball for the club to move freely through the strike.
- Rehearse controlled rotation: Use a slow-motion rehearsal through impact, maintaining functional inclination and space as the body rotates instead of rising abruptly or restricting the turn.
- Verify the strike and body-space cue: Check whether the clubhead returns with more centered contact while body height and spacing remain controlled through impact.
Use strike feedback and the visible body-space relationship through impact as verification rather than judging head position alone.
If centered contact becomes more repeatable while rotation remains natural, the posture change is supporting the intended clubhead return.
If the strike remains inconsistent, reassess the amount of inclination or space without trying to hold the body fixed.
Recenter and Move Pressure Forward Through Impact
Use recentering during transition and allow pressure to move toward the lead side so the low point can return in a more useful place for iron contact.
The sequence describes timing from backswing to impact rather than a fixed numerical pressure target, and the appropriate pattern can vary with the golfer and club.
- Complete the backswing without excessive sway: Finish the backswing while keeping body movement controlled enough that returning toward the lead side remains possible during transition.
- Recenter during transition: Begin recentering as the backswing changes direction, allowing body position to return toward the lead side without exaggerated lateral movement.
- Move pressure toward the lead side and verify: Continue the pressure shift through impact, then check the strike and ground contact to see whether the low point and iron contact have become more useful and repeatable.
Use contact feedback for verification rather than relying on body feel alone.
More centered iron contact with a ground-contact pattern that better matches the intended strike supports the adjustment, while unchanged topping suggests the timing or another diagnosed variable still needs attention.
Pressure movement and body position are related but are not identical, so the correction should not be interpreted as holding the body permanently toward the lead side.
Recheck the pattern across repeated shots before changing another variable.
Maintain Arm Extension Through Impact
Preserve useful lead arm extension through impact so the swing radius does not shorten abruptly and raise clubhead height relative to the ball.
The goal is functional arm length without excessive tension while allowing natural joint motion.
Rehearse a controlled half-swing while allowing the lead arm to maintain enough extension through the strike for the clubhead to return at a consistent height.
Keep the arms responsive rather than adding tension to hold a fixed shape.
Use centered contact as the main feedback cue for verification, and repeat the half-swing until the strike pattern becomes more consistent.
If contact remains high on the ball, reassess the functional extension before adding more speed or changing another variable.
Drills to Stop Topping the Ball
The useful drill is the one matched to the diagnosed cause rather than a routine chosen at random.
A topping-correction drill should target the variable that needs work, such as low-point control, posture, or balance, and provide feedback that shows whether the intended change is transferring into better contact.
Choose the method by checking what it trains, what feedback it produces, and what success signal confirms that the constraint is helping.
This keeps practice tied to the diagnosed variable instead of repeating an exercise that does not address the likely cause.
The criteria below move from identifying the target variable to evaluating feedback and then confirming whether the change transfers.
- Identify the trained variable: Use a drill only when its constraint directly supports the diagnosed cause, such as low-point control, posture, or balance.
- Use relevant feedback: Observe the contact, ground interaction, body-position cue, or balance response that the drill is intended to make easier to detect.
- Confirm the success signal: Look for more repeatable contact while the targeted variable improves, then reduce the constraint progressively to test transfer into a normal swing.
A drill should become less restrictive as the improved strike starts to appear without the original constraint.
Transfer matters because a practice exercise has served its purpose only when the useful change can be retained in the normal swing with repeatable feedback.
If the strike deteriorates as the constraint is removed, return to the diagnosed variable rather than adding unrelated drills.
Low-Point Control Drills
Use a low-point control drill to make the swing bottom observable through a reference line, spot, or other clear contact point rather than judging the result only by ball flight.
A ground-contact drill or, when suitable for the club and diagnosed pattern, a towel drill can provide feedback about where the club reaches the ground relative to the ball.
- Set the reference: Mark a line or spot near the ball so you can compare intended and actual ground contact. For a towel drill practising a descending iron strike, place the towel behind the ball with enough clearance for a normal ball-first swing, and begin with a slow rehearsal.
- Make a controlled rehearsal or shot: Start with a slow rehearsal, then make a controlled shot while keeping the motion appropriate for the club rather than trying to force the club downward.
- Read the ground-contact feedback: Compare the club's ground contact with the reference line or spot, or note whether the towel is contacted before the ball. Use that feedback to interpret whether the low point is returning in a more useful place.
- Adjust and progress: Make one small adjustment, repeat the drill, and progress from slow rehearsal to a normal shot only when repeatable contact is appearing around the intended reference.
The useful feedback is the relationship between the reference point, ground contact, and ball contact, not simply whether one shot gets airborne.
Keep the drill club-appropriate because the intended ground-contact pattern can differ with the strike being practised.
Progression should follow repeatable contact: reduce the constraint and return toward normal shots while checking that the low-point pattern remains stable.
Posture and Balance Drills
Use posture and balance drills when diagnosis suggests that balance, sway, or posture loss is contributing to topped contact.
The goal is to improve control of body height and space through the swing while allowing natural head and body movement.
- Set up with the relevant drill: Use a feet-together setup when balance is the main issue, or a slow-motion rehearsal when posture control and space through impact need closer attention.
- Perform at controlled speed: Make a controlled swing or rehearsal that lets the body rotate naturally while maintaining enough balance, body height, and space for a consistent clubhead return.
- Observe balance, posture, and strike feedback: Check whether balance remains stable, posture changes stay controlled, and contact becomes more consistent. Treat the feedback as evidence about the movement pattern rather than proof of one specific cause.
- Return progressively to normal stance: Reduce the drill constraint and move back toward a normal stance while observing whether the improved balance, space, and contact are retained.
The useful feedback is the combination of balance, posture control, clubhead return, and strike quality rather than head position alone.
A feet-together or slow-motion drill fits only when the diagnosed movement problem makes that constraint relevant.
Progress back to the normal stance as contact becomes more repeatable, and reassess the diagnosis if the same topping pattern remains.